How Do I Install An Inverter In My RV Easily? | Palmgear
by Alice Davis
Now that you've gotten the right power inverter for your recreational vehicle, probably the only thing bothering your mind is how to wire it correctly to your RV. Right?
If you're not the DIY type, you might think that this task is too complicated and just not for you.
But the truth is, installing an inverter in your RV is pretty simple and even an absolute beginner with no prior experience can do it correctly.
This guide will take you through the key steps to follow to install an inverter in your RV.
Contents

How To Install RV Inverter (The Basics)
As we've just stated above, installing an invert in your RV is quite simple and you do it on your own when given a set of instructions to follow.
This is especially true if you're installing a small inverter. For instance, if you're installing an inverter for charging your mobile devices, installing it can be as simple as pluginng it into a 12V power outlet or cigar lighter. no wiring needed.
For a larger inverter, the installation process will require some more work as you'll need some to do some wiring.
The REAL complications arise when it comes to routing your inverter's output AC current to where it's required-either to an existing or new outlet, or both.
When routing to existing outlets/appliances, you'll to disconnect the circuit wires feeding the outlets/appliances from existing load center (the breaker) and connect them to the inverter.

But you won't be saying goodbye to the circuits because you still need them to work with shore power (so, you'll need some kind of switch to safely move between the shore and inverter power sources).
Typically, you'd want to wire your inverter output to a separate power panel that in turns supplies the existing outlets with power.
You'll also route the power from your main breaker panel to this panel and utilize the automatic transfer switch (commonly abbreviated as ATS) to help you control which power to use.
You can choose an easier method of installing an inverter in your RV, which involves creating new outlets that will only be powered by the inverter. You can achieve this by using extension cord from your inverter outlet plug to where you need the power to go.
Experienced Rvers would agree that a more elegant method would involve wiring your RV outlets. However, this method might not be suitable for RVs with thin wires as running wires can be challenging. Or you can your way around this by surface-mounting the wires.
With these RV inverter installation basics in mind, you can now get down into the details of installing your new inverter in your RV…
Things You'll Need:
- Electric cables (most manuals indicate the wires you need for the job)
- Wire cutters/strippers
- A toolset (comprising screwdrivers, sockets, wrench, utility knife, etc.)
- Zip ties
- Electric tape
- The best RV inverter for your RV
- The inverter user manual
Steps for Installing Your RV Inverter:

Step One: Decide the perfect area to install the inverter.
Before everything else, you'll need to decide on the perfect area where you'll install your new RV inverter. If you already have an existing inverter, you just need to place your new one where the other one was.
The ideal location where the chances of accidents occurring are next to zero. Avoid places like high traffic areas, below the foot level, near a heat source, or below an area where liquids are regularly flowing.
You should also place it in an area with free air circulation, and it shouldn't be near anything flammable.
AND…the inverter should be as close as possible to the battery it'll be working with to help minimize voltage loss.
Step Two: Fasten the inverter in place.
Once you have identified the perfect location for your inverter, it's time to secure it in place. This step is essential because the electronic components housed in the inverters are usually delicate and shouldn't suffer any form of concussion.
That's why the manufacturer sends the device to you with pre-drilled holes to help you easily fasten it in place so that it doesn't fall or feel shaky as you move around.
The pre-drilled holes usually accept screws or lag bolts (for larger units). If the manufacturer doesn't include the fasteners, you can get some from the nearest electrics store.
Step Three: The Wiring part.
Now, this is the step where you do the wiring of your new inverter so that it can start supplying power to your existing RV outlets to power your appliances.
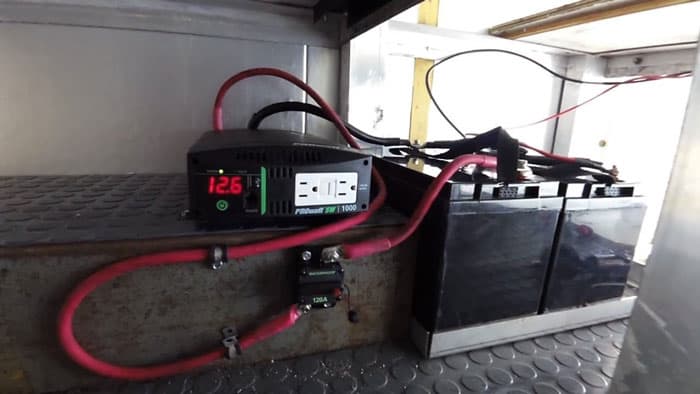
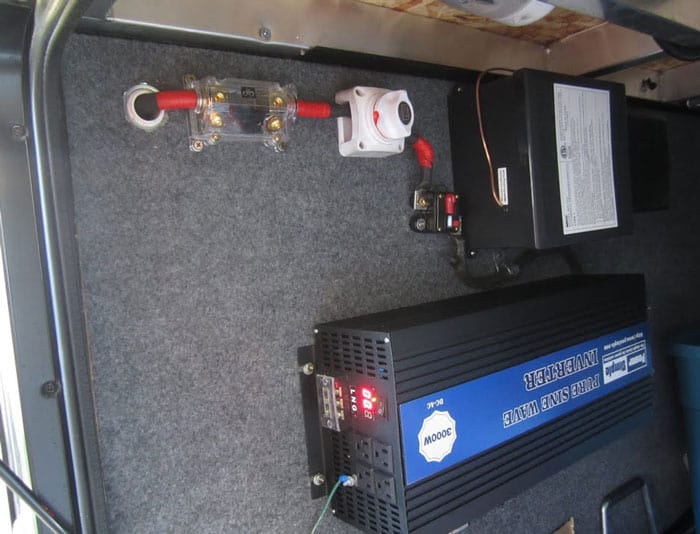
FIRSTLY…you'll need to wire your unit directly to the battery it'll be drawing power from. Note that this battery isn't the one running your vehicle engine but the battery coach connected to your solar system.
Consult your user manuals on the right cable sizes and circuit protection to use for the wiring. Typically, you'll need a 4-gauge electric cable and 150-amp circuit breaker or fuse for a 1000Watts inverter.
As we explained earlier on, the most IMPORTANT thing to remember here is that you don't have the shore/generator power connected to the inverter output.
We explained the different method you can wire your inverter to achieve this, so we won't get into details about.
The most elegant involves connecting your inverter directly to your RV's distribution box via a transfer switch that automatically selects generator or shore power or inverter power.
Step Four: Don't forget the ground!
Still, at it, you'd also want to ground your inverter in this step. This is as simple as connecting our 12V ground cable to a bolt driven in your vehicle chassis rail (near the inverter) or any other excellent ground connection.
NOTE: The cable you use for the ground ought to be the same gauge as your supply cable.
RV Installation Safety Tips
- NEVER run your inverter and converter at the same time. If you do so, you'll be pulling current out of your battery and at the same time pushing it in. And this can quickly drain your battery, forcing the inverter to shut off due to low battery.
- NEVER wire the shore or generator power and inverter power to deliver the power to your RV outlets at the same time. We have already mentioned this severally before, it's worth repeating it as making this costly mistake can lead to heavy damages and even the possibility of a fire breakout. Using an ATS (Automatic Transfer Switch) helps ensure ONLY one of these power sources is supplying power to your appliances at a time and NOT both.
- AVOID powering your battery charger/converter with your inverter. In simpler words, make sure that your battery converter does NOT receive power from the inverter. You can avoid this is by using a split distribution panel-with a converter on the panel that's not connected to your inverter. Or you can use a relay.
Wrap up
If you don't have a clue how to go about installing your new power inverter in your RV, this guide will take you all the installation and a step by step guide on how to do it, and safety tips to keep in mind.
The guide is easy to follow, even for absolute beginners who have never done it before.
Remember to use your inverter's user manual as your primary source of reference when doing the installation.
 |
 |
 |
 |
 |
 |
 |
 |

About Alice Davis
Alice is a writer who lives in the City of Long Beach. She has a husband, an exceptionally small chihuahua, and 15-pound Maine Coon. Alice got her bachelor of science in biological science from UC Berkeley. Now, she likes writing about a lot of things; including but not limited to technology reviews, science stuff, and anything food-related.
Leave a Reply
You can get FREE Gifts. Or latest Free phones here.
Disable Ad block to reveal all the info. Once done, hit a button below
 |
 |
 |
 |